TL;DR
- Achieving a durable finish requires meticulous surface preparation, including industrial degreasing and scuff sanding (120-150 grit), as poor adhesion is the primary cause of premature chipping and peeling.
- A true factory-smooth finish without brush marks is accomplished through professional HVLP (High Volume, Low Pressure) spray application, using specialized, self-leveling urethane-alkyd hybrid enamels.
- Professional results demand strict environmental control (60-75°F and below 50% humidity) to allow the paint to level properly before drying.
- To prevent sticky doors and ensure maximum durability, the paint must be allowed to complete its full curing process, which typically takes two to four weeks after application.
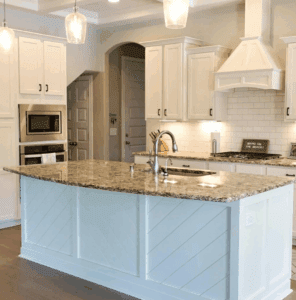
Painting your kitchen cabinets is an investment that transforms your entire Nashville home, delivering the aesthetic impact of new kitchen cabinets without the high cost or lengthy demolition.
However, achieving a true, durable factory-like finish demands far more than just a brush and a can of paint. Many homeowners attempt easy cabinet painting only to be frustrated by common paint defects.
Rooted in tradition, Pointer Painting is driven by craftsmanship. We understand that issues like visible brush marks, premature paint chipping, and sticky doors are often signs of improper surface preparation or rushed application.
This complete guide explains the proprietary process professional painting contractors use to ensure a flawless, long-lasting cabinet finish, addressing the root causes of chipping paint and unsightly imperfections.
Eliminating Brush Marks and Preventing Paint Chipping
When homeowners tackle cabinet painting, they often struggle to achieve the smooth, durable surface they desire. The primary challenges are eliminating brush marks and ensuring proper paint adhesion to prevent little chips from forming.
For expert cabinet painting results, the difference lies in specialized painting supplies and professional painting techniques.
Unlike standard interior doors or wall surfaces, kitchen cabinets require high-performance coatings and specialized application methods.
Professional painting contractors rely on sophisticated methods, including the use of a Mobile Spray Booth and high-volume, low-pressure (HVLP) sprayers, which atomize the coating to guarantee a perfectly smooth, self-leveling finish without brush marks.
We combine high-quality painting tools, like specialized hinge hooks (such as EFC Hinge Hooks) and RZ Respirator safety equipment, with meticulous surface preparation to guarantee durability for every cabinet painting project in Nashville. We ensure your new finish avoids the cabinet paint problems that plague DIY attempts.
Rooted in Tradition: Why DIY Cabinet Painting Fails in Nashville
Painting your kitchen cabinets successfully demands precision. Many homeowners attempt easy cabinet painting only to be frustrated when the results fail within a year. While the finish might look great initially, cabinet paint problems often surface later as unsightly paint defects.
The core reasons for failure are universal across DIY cabinet painting projects: poor adhesion, inadequate leveling, and improper curing time.
Cabinetry demands a standard far beyond painting interior doors or walls. It requires professional painting supplies, specialized painting techniques, and a controlled environment that ensures a long-lasting finish.
Preparation is Paramount: Preventing Chipping Paint and Little Chips
If you observe chipping paint, especially little chips near handles or edges, the failure is almost always rooted in surface preparation. New paint cannot bond correctly if the existing finish is slick, dusty, or greasy.
Professional cabinet refinishing starts with meticulous cleaning. We use industrial-strength degreasers to strip all contaminants. This crucial step guarantees long-term paint adhesion and prevents premature paint chipping.
Next comes sanding. The surface must be sanded with 120 to 150 grit to create a proper texture, or “tooth,” for the bonding primer to grip. After sanding, dust must be thoroughly removed with a tack cloth before any coating is applied. Skipping this foundational prep work ensures your new kitchen cabinets will suffer from early failure.
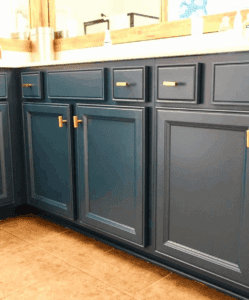
Achieving the Factory Finish: Eliminating Visible Brush Marks
Amateur brush marks ruin the professional look of a refinished kitchen. Visible streaks, drips, and ridges occur when the paint dries too quickly or when low-quality materials are used. The key is achieving a finish without brush marks.
To achieve a truly smooth, professional result, painting contractors rely on specialized materials and advanced application techniques.
Specialized Materials and Leveling
We only use professional-grade cabinet enamel, such as high-quality urethane-alkyd hybrid enamels. These products are formulated to be self-leveling, allowing the paint to settle flat before it dries. Using a high-quality bonding primer is also essential to improve adhesion to the slick cabinet surface.
Controlling the Environment and Application Techniques
Achieving a finish without brush marks requires strict control over the painting environment. Professionals maintain room temperature between 60 and 75°F and keep humidity levels below 50%. This slows the drying time, allowing the self-leveling paint to flow out completely.
While techniques taught by experts like The Paint People and Paint Life TV emphasize maintaining a ‘wet edge’ and using high-quality brushes and high-density foam rollers, these methods rarely eliminate marks entirely on large cabinet surfaces.
That is why Pointer Painting utilizes HVLP spray equipment. Utilizing a Mobile Spray Booth allows us to atomize the coating into a fine mist. This professional technique eliminates the possibility of brush marks entirely, delivering the durable, factory-like finish that hand application simply cannot replicate.
Patience and Curing: Avoiding Sticky Doors and Drawers
Sticky doors and drawers are a common paint defect resulting from rushing the process. If a cabinet door is closed before the paint has fully cured, the surfaces will bond together, leading to sticking and immediate peeling when opened.
While paint may be dry-to-touch in hours, the extensive paint curing process takes much longer. Even with high-performance coatings, full cure strength typically requires two to four weeks under ideal environmental conditions.
We use specialized painting tools, such as EFC Hinge Hooks, to handle and dry doors safely without contact during this crucial period. Rushing the reinstallation process is a primary reason homeowners experience premature paint chipping and sticky cabinets. Trusting your cabinet painting project to experienced painting contractors ensures this critical curing time is respected, guaranteeing the longevity of your investment.
The Foundation: Meticulous Surface Preparation (Prep Work)
The secret to a durable, factory-like finish when you paint cabinets is rigorous surface preparation (often called Prep Work). For Pointer Painting, this meticulous process is rooted in tradition and driven by craftsmanship. It is the only way to prevent costly paint defects before we even open a can of primer.
If you want results that look like new kitchen cabinets, you cannot skip or rush this essential phase.
Deep Cleaning and Industrial Degreasing
Kitchen cabinets accumulate years of grease, grime, and cooking residue. This layer of contamination is the number one enemy of adhesion. Even if you believe your cabinets are clean enough, they require industrial-strength degreasing.
Professional painting contractors understand that common household cleaners are insufficient. We use specialized degreasers, such as Trisodium Phosphate (TSP) or other industrial cleaners, designed to cut through years of build-up.
This step is crucial to ensure maximum paint adhesion and longevity. If you skip this deep cleaning, the paint will adhere only to the grease, not the cabinet surface, leading directly to premature peeling and chipping paint.
Sanding for Adhesion and Longevity
Once the surface is completely degreased and dry, the cabinets must be scuff-sanded. This process deglosses the existing finish and creates a microscopic texture, which gives the primer something reliable to grab onto.
We typically use 120-150 grit sandpaper to achieve this perfect surface texture. This ensures that the subsequent coats of primer and cabinet painting enamel bond securely, preventing little chips down the road.
After sanding, all dust must be meticulously removed. Professional painting contractors use a high-powered vacuum and specialized tools like a tack cloth before applying any bonding primer. Residual dust is a paint defect waiting to happen.
Achieving the Factory Finish: Eliminating Brush Marks
Once the essential surface preparation is complete (including meticulous sanding, typically 120-150 grit, to create a proper texture and cleaning to remove all dust using a tack cloth), the next phase focuses on the application itself.
To paint cabinets without brush marks and achieve that durable, factory-like aesthetic, Pointer Painting relies on two key components: specialized materials and advanced application techniques. This separation of skill is what truly defines a high-quality, lasting cabinet painting job in Nashville.
Choosing Professional-Grade Cabinet Enamel and Primers
The choice of coating is paramount. We never treat cabinetry like standard wall surfaces. To guarantee longevity and prevent future chipping paint, we rely on specialized bonding primers designed to grip slick surfaces. Utilizing a high-quality primer is non-negotiable for preventing future chipping.
We use professional-grade cabinet enamel, typically water-based acrylic or urethane-alkyd hybrid enamels. These products are engineered for maximum hardness and durability.
For achieving a finish with no brush marks, we specifically look for paints with high self-leveling properties, such as Benjamin Moore ADVANCE or Sherwin-Williams Emerald Urethane.
These specialized paints allow the finish to settle flat before drying, significantly reducing the chance of visible brush marks or other paint defects.
Controlling the Environment for a Smooth Finish
Even the best self-leveling paint will fail if applied incorrectly or in poor conditions. Professional painting contractors understand that environmental controls are crucial to success in cabinet painting.
Controlling the room temperature (ideally between 60°F and 75°F) and maintaining humidity levels below 50% are vital steps.
This careful regulation slows the drying time, which allows the paint leveling process to occur properly before setting, the key to avoiding brush marks and blemishes. We also minimize airflow and breezes during application to ensure a pristine finish.
The HVLP Advantage: The True Factory Finish
While some easy cabinet painting tutorials suggest only using a brush and roller, the highest quality finish is achieved using High Volume, Low Pressure (HVLP) sprayers. Hand brushing simply cannot replicate the smoothness required for new kitchen cabinets.
HVLP spray equipment atomizes the coating into a fine mist. This process provides an incredibly even, high-quality finish, resulting in a surface that looks smooth, like a component straight from the factory.
To manage this process professionally, we utilize a Mobile Spray Booth setup on-site to contain overspray and ensure a clean working environment, protecting the rest of your Nashville home.
We also use specialized painting supplies and painting tools like EFC Hinge Hooks to hang interior doors and drawer fronts for 360-degree application, and our team wears appropriate safety equipment, such as an RZ Respirator, demonstrating the precision and professionalism required for this process.
Expert Painting Techniques for Hand Application
Even when using an HVLP sprayer, certain fixed sections may require careful hand-application. If hand-application is necessary, professionals employ specific painting techniques to minimize texture and avoid brush marks.
This begins with using the right tools: high-quality, soft nylon/polyester brushes (2 to 2.5 inch angled) and high-density foam or mohair mini rollers (4 to 6 inch) for applying thin, even coats.
Key techniques include controlling paint viscosity and maintaining a “wet edge.” Maintaining a wet edge means overlapping wet paint onto wet paint to prevent drying lines, ensuring the paint levels properly.
The ‘roll and tip’ technique, using a high-density foam roller followed immediately by a soft brush, can help level the paint surface, working toward no brush marks.
Patience is Key: Understanding the Paint Curing Process
A common mistake that leads to cabinet paint problems, such as little chips and premature wear, is rushing the final steps. While the paint may feel dry to the touch in hours, it is not fully cured.
The Paint Curing Process is the time needed for the enamel to reach maximum hardness. Depending on environmental conditions and the specific enamel used, this can take anywhere from two to four weeks.
During this period, careful handling is essential to ensure the longevity of your finished kitchen cabinets. Pointer Painting ensures our clients understand this critical final phase to guarantee the durability of the finished product and prevent future paint chipping.
Tooling Up: Precision Instruments for Professional Cabinet Painting
Achieving a durable, high-end finish on your Nashville kitchen cabinets demands the right application techniques, and the right tools. Professional painting contractors understand that the quality of the painting tools and accessories directly impacts the final appearance, ensuring we deliver results without brush marks or paint defects.
The Right Application Tools: Brushes and Rollers
While we often favor spray application, brushes and rollers are crucial for specific areas and priming steps. To paint cabinets without brush marks, we invest in specialized equipment.
For cutting in or detailed areas, we rely on high-quality, soft nylon/polyester brushes, typically 2 to 2.5 inches wide and angled. This design allows us to hold the professional-grade cabinet enamel efficiently and maintain a “wet edge” for smooth, consistent coverage.
For large flat surfaces, high-density foam or mohair mini rollers (4 to 6 inches) are essential painting supplies. These tools ensure we apply multiple thin coats evenly, which is fundamental to preventing excessive paint buildup that can lead to sticky doors, drips, or texture on the finish.
Achieving the Factory Finish: HVLP Spray Systems
To eliminate the risk of visible brush marks entirely and achieve a true factory finish on your cabinet painting project, professional-grade spray equipment is necessary.
We utilize High Volume Low Pressure (HVLP) systems. These sprayers atomize coatings perfectly, allowing for even, self-leveling application. Consistent results depend on using the correct HVLP accessories and maintaining precise control over paint viscosity.
For larger jobs, efficient painting contractors often set up a Mobile Spray Booth. This ensures we maintain strict environmental controls during painting, managing humidity control and airflow, which is vital for proper Paint Leveling and curing.
Efficiency and Safety in Cabinet Painting Techniques
Our commitment to craftsmanship extends to efficiency and safety, ensuring minimal disruption while guaranteeing a durable, long-lasting result.
Safety is paramount, especially when working in enclosed spaces like a kitchen or master bathroom. Professional painting contractors protect their teams by using appropriate gear, such as the RZ Respirator, to guard against fine paint particles and volatile organic compounds.
We align with the stringent standards set by industry leaders like Paint Life TV and The Paint People, sourcing quality painting supplies from recognized vendors like Paint Life Supply Co.
We also utilize specialized hardware like EFC Hinge Hooks. These innovative tools allow us to hang cabinet doors and drawers, enabling us to paint all sides simultaneously. This ensures complete coverage, prevents little chips caused by premature handling, and optimizes the drying time for the best possible result on your new kitchen cabinets.
Achieving a Factory Finish: Comparison of Cabinet Painting Application Methods
Rooted in tradition, Pointer Painting is driven by craftsmanship. When we undertake cabinet painting in Nashville, our core promise is a durable, factory-smooth finish that eliminates common paint defects like visible brush marks and premature paint chipping.
While standard roll and brush methods are common for DIY projects, they cannot replicate the precision and longevity of a professional system. As experienced painting contractors, we generally recommend and utilize a high-volume, low-pressure (HVLP) spray application.
Using specialized equipment, including professional HVLP accessories and often a dedicated Mobile Spray Booth, allows us to control the environment and achieve perfect paint leveling. This is the only reliable way to guarantee that your kitchen cabinets look like new kitchen cabinets, not repainted ones, without brush marks.
| Feature | HVLP Spray Application (Pro Grade) | Roll and Brush (DIY/Standard) |
|---|---|---|
| Finish Quality | Factory-smooth, consistent, zero brush marks. Ideal for avoiding paint defects. | Slight texture visible, high risk of brush marks and uneven finish. |
| Durability | Excellent. Uniform film thickness highly resistant to chipping paint, offering maximum protection. | Good, but uneven application can lead to premature wear and little chips. |
| Speed | Faster application time, but requires extensive prep work (e.g., setting up the Mobile Spray Booth) and cleanup. | Slower application time, faster cleanup. Often requires more coats to achieve proper coverage. |
| Materials Used | Professional-grade 2K coatings or specialized urethane-alkyd hybrid enamels, specialized HVLP accessories. | Standard brushes, foam rollers, general painting supplies. |
Why Professional Spraying Eliminates Brush Marks
The key to achieving a flawless finish on paint cabinets is atomization. HVLP sprayers break down the professional-grade cabinet enamel into an incredibly fine mist. When applied, this coating levels perfectly before drying, providing a seamless finish without brush marks.
Conversely, even when using the highest quality painting supplies, rolling and brushing forces the paint onto the surface. This technique inherently risks leaving ridges, streaks, or texture, making the finish susceptible to paint chipping over time. For long-term performance and visual excellence, there is no substitute for the spray application method used by expert painting contractors.
This process ensures every surface, from the detailed edges of the doors to the face frames, receives a consistent, durable layer of paint, significantly reducing the chance of paint defects.
Controlling the Environment: The Foundation of a Durable Finish
We rely on professional spray application for cabinet painting in Nashville, but even the highest quality cabinet enamel requires a controlled environment to cure correctly.
This critical step is often overlooked in painting tutorial videos you find on YouTube or Google, yet it is fundamental to avoiding major paint defects, premature chipping paint, and sticky doors.
Temperature and Humidity Control
The speed at which paint solvents evaporate heavily influences the process of paint leveling. If the paint dries too quickly (due to high heat or low humidity), it locks in texture, resulting in visible brush marks and a failure to achieve a smooth finish.
Professional painting contractors understand the science of the Paint Curing Process.
We maintain the room temperature between 60 and 75 degrees Fahrenheit throughout the application and initial curing stages. This temperature range allows the self-leveling paint time to flow out.
Crucially, Humidity Control is paramount. Humidity levels must be maintained ideally below 50 percent. While high humidity slows the initial drying time, it can interfere with the final hardness of the finish, compromising the durability of your kitchen cabinets.
Minimizing Airflow and Contamination
Airflow, or breezes, must be minimized during application. Strong drafts cause rapid surface drying, which prevents the self-leveling paint from settling smoothly, leading to blemishes and texture.
To deliver a finish without brush marks, Pointer Painting often utilizes a dedicated Mobile Spray Booth setup.
This allows us to manage airflow meticulously, ensuring proper ventilation for safety without causing blemishes or attracting dust onto the wet paint surface. This precision guarantees a durable, factory-like finish that lasts, preventing little chips down the line.
Understanding Paint Curing and Longevity
We rely on professional spray application and environmental controls to achieve a factory finish on your kitchen cabinets. However, the work is not finished when the paint is dry to the touch.
Achieving a truly durable surface that resists chipping paint requires patience and adherence to the crucial Paint Curing Process.
The Difference Between Dry and Cured
When you paint cabinets, the coating is dry when you can touch it without transfer. Yet, the paint is still vulnerable to damage and sticky doors at this stage.
The coating is only fully cured once it has reached its maximum hardness and chemical resistance. This is what prevents frustrating paint defects down the road.
For the high-quality, Professional-Grade Cabinet Enamel we use for cabinet painting, the proper curing time is typically two to four weeks under ideal environmental conditions.
Rushing this process (such as closing doors too soon or quickly putting heavy items back into drawers) is the leading cause of premature chipping and little chips.
Many painting tutorial videos found on YouTube or Google often overlook this critical timeline, leading to frustration for DIY homeowners.
The Pointer Painting Guarantee: A Durable Finish
As dedicated painting contractors in Nashville, we ensure every step of your cabinet painting project is managed correctly, resulting in a finish without brush marks.
We manage everything from meticulous sanding techniques between coats to the final post-painting curing environment.
We believe in delivering excellence that lasts. That means providing you with clear, comprehensive instructions on handling and care during the critical two-to-four-week curing phase.
This attention to detail ensures the longevity of your newly painted kitchen cabinets.
Ultimately, using low-quality materials or skipping critical surface preparation steps inevitably leads to premature failure and chipping paint, regardless of how carefully you handle the finished product.
Pointer Painting ensures your new kitchen cabinets receive a durable, high-quality finish, rooted in our tradition of precision and reliability.
Why Choose Pointer Painting for Your Nashville Home
If you are looking for expert cabinet painting in Nashville without the common paint defects like visible brush marks, premature paint chipping, or sticky door problems, trust the professionals at Pointer Painting.
Rooted in tradition and driven by craftsmanship, we apply a comprehensive, multi-step process to every project, whether we are refinishing your kitchen cabinets, restoring interior doors, or completing whole house painting.
Achieving a long-lasting, factory-like finish demands precision, professional painting supplies, and adherence to strict technical standards. We never cut corners on the critical steps that ensure durability and beauty.
The Foundation of Longevity: Meticulous Surface Preparation
The single greatest factor in preventing chipping paint and ensuring longevity is meticulous surface preparation, or prep work. Paint cannot adhere properly to grease or residue, leading to peeling almost immediately. We treat every cabinet job like new kitchen cabinets, ensuring pristine surfaces.
We begin by thoroughly cleaning cabinets using industrial-strength degreasers to remove all contaminants. Following this, we meticulously sand the surface using 120-150 grit sandpaper to create a proper texture for primer adhesion. Removing sanding dust completely with a tack cloth is foundational before we even consider opening a can of paint.
Achieving a True Factory Finish with HVLP Application
While some painting contractors rely on traditional brushes and rollers, achieving a true cabinet refinishing result requires high-quality spray techniques. Pointer Painting utilizes High Volume Low Pressure (HVLP) sprayers.
HVLP application atomizes the coating, delivering an incredibly fine, even layer that self-levels perfectly, eliminating brush marks and creating a hard, durable finish that rolling cannot replicate. For efficiency and cleanliness, we often utilize a Mobile Spray Booth setup and professional painting tools like EFC Hinge Hooks to manage the doors and drawer fronts during application.
Our commitment to safety and precision is paramount. Our team uses appropriate safety equipment, including RZ Respirator masks, ensuring a clean and controlled environment while applying thin, multiple coats for superior depth and resilience.
Selecting Professional-Grade Cabinet Enamel
The choice of material is just as critical as the application technique. We rely exclusively on professional-grade cabinet enamel and bonding primers designed for maximum durability. Low-quality paint leads to inevitable little chips and peeling.
We utilize advanced water-based acrylic or urethane-alkyd hybrid enamels, such as Benjamin Moore ADVANCE or Sherwin-Williams Emerald Urethane. These products are formulated specifically for kitchen cabinets to maximize paint leveling, resulting in a smooth, hard finish that resists the daily wear and tear of a busy Nashville home.
Controlling the Environment to Eliminate Brush Marks
Many common cabinet paint problems, including brush marks and texture defects, are caused by uncontrolled environmental factors. Paint needs time to level out before it dries, a process severely hindered by heat, breezes, or low humidity.
We maintain strict environmental controls, keeping the painting area between 60-75°F and humidity levels below 50%. This controlled setting allows the professional-grade enamel to slow down drying, enabling paint leveling and ensuring a flawless finish without streaks or ridges, a core principle emphasized by experts in the field, like those often featured on Paint Life TV.
Even if we must use a brush or roller on specific interior doors or fixed cabinet components, we employ advanced painting techniques, such as maintaining a ‘wet edge’ and applying multiple thin coats using high-quality, soft nylon/polyester brushes and high-density foam rollers to avoid texture and streaks.
Understanding the Critical Paint Curing Process
We believe that completeness means educating our clients about the final, crucial step: paint curing. While the coating is dry to the touch in hours, the paint is not fully cured and maximally hardened until two to four weeks later.
Rushing the curing process is the primary reason homeowners experience premature paint chipping and paint defects. Pointer Painting provides detailed instructions on handling your newly painted kitchen cabinets during this sensitive period, ensuring the hard, durable finish you invested in will last for years to come.
Pointer Painting is proud to serve the Nashville area, delivering excellence in every coat. If you are ready to transform your kitchen cabinets, interior doors, or master bathroom with a factory-quality finish, contact us today.
Frequently Asked Questions About Cabinet Painting
Painting your existing kitchen cabinets is a complex project. Our Nashville clients often have detailed questions about how we guarantee long-lasting, factory-quality results. Here are the answers to the most common cabinet paint problems we solve daily.
1. How Do Professionals Guarantee Against Chipping and Peeling?
The best defense against premature paint chipping is meticulous surface preparation, or prep work. This is the foundation of any long-lasting finish.
First, the surface must be perfectly clean. Professionals use industrial-strength degreasers, often TSP, to strip away years of grease and grime. If the surface isn’t immaculate, the paint cannot bond, leading quickly to peeling and paint defects.
Next, we scuff-sand the surface with 120-150 grit sandpaper to create the ideal texture for maximum adhesion. A high-quality bonding primer is then applied, followed by multiple thin coats of topcoat.
Finally, patience is key. Allow the paint to fully cure, which takes between two and four weeks, before subjecting your new kitchen cabinets to heavy use. Rushing this process is the main cause of little chips appearing early.
2. What Is the Best Type of Paint for Kitchen Cabinets?
The best cabinet paint is a professional-grade, water-based urethane-alkyd hybrid enamel. This material offers the superior hardness and durability of older oil-based paints, but with the low odor, easy cleanup, and quick dry time of a water-based product.
Brands like Benjamin Moore ADVANCE or Sherwin-Williams Emerald Urethane are popular choices among painting contractors because they offer superior Paint Leveling. This self-leveling paint minimizes texture and ensures a hard, durable finish that resists scratches and moisture.
3. How Do Painting Contractors Achieve a Finish Without Brush Marks?
Achieving a true factory finish without brush marks requires specialized equipment and advanced painting techniques.
Pointer Painting primarily eliminates brush marks entirely by utilizing professional HVLP sprayers. HVLP application atomizes the coating into a fine mist, providing an incredibly smooth, even layer that hand brushing or rolling simply cannot replicate.
For large projects, we utilize systems like the Mobile Spray Booth to control the environment and ensure a flawless application, achieving that desired smooth finish without brush marks every time.
4. What Specific Tools and Techniques Prevent Texture Defects?
When spraying isn’t possible, painting contractors must employ specific tools and rigorous environmental controls to achieve a smooth result.
If applying by hand, we use high-quality, soft nylon/polyester brushes (2-2.5 inch angled) and high-density foam or mohair mini rollers. These tools allow for thin, even coats and are critical for minimizing texture.
The technique involves maintaining a ‘wet edge’ and applying multiple thin coats rather than one thick coat. Resources from experts like The Paint People and Paint Life TV frequently emphasize this approach.
Furthermore, controlling the environment is vital to slow the drying process and allow the self-leveling paint to work its magic. We maintain room temperatures between 60-75°F and humidity levels below 50%. This controlled setting prevents defects and ensures Paint Leveling is maximized.
5. Why Are My Cabinet and Interior Doors Sticking After Painting?
Doors stick when they are closed before the paint is fully cured. Even if the surface feels dry to the touch, the paint underneath is still soft and tacky. This is a common issue when painting interior doors or master bathroom cabinets.
You must ensure you maintain adequate drying time between coats and allow the paint to cure completely before latching the doors closed. High humidity, a frequent issue in Nashville, can significantly extend this curing time, sometimes pushing the needed wait time closer to four weeks.
To prevent this issue, Pointer Painting uses specialized painting supplies like EFC Hinge Hooks to hang and spray doors, ensuring they dry completely suspended before reinstallation.
6. Can I Get a Factory Finish Through Easy Cabinet Painting DIY Tutorials?
While many easy cabinet painting tutorials exist on YouTube and Facebook, achieving a true factory finish without visible brush marks is extremely difficult for a DIYer. It requires specialized painting tools, professional-grade equipment, and expert knowledge of advanced painting techniques and environmental control.
Professional painting contractors, like Pointer Painting, invest in tools such as the RZ Respirator for safety, Mighty Boards for protection, and HVLP accessories to guarantee flawless results. The systems and precision required to avoid common paint defects are why homeowners trust the experts.
If you are looking for a complete guide to long-lasting results for your kitchen cabinets, trusting a professional painting company ensures you avoid the frustration and expense of fixing common cabinet paint problems later.